Thursday, March 5, 2020
Brides Maid Boxes
I told one of our Rubber Buggy Brigade members that I will get this posted for her since she is interested in making these boxes. I thought I had this posted earlier this past year but didn't for The Rubber Buggy so better late than never.
I made 6 Maid-of-Honor gift boxes for my grand daughter's wedding last year. Actually, the thinking part took longer than doing it and it was fun making these for her to hand out at her bridal shower.
The Rubber Buggy has the supplies, embellishments and papers that you will want to have before you begin these fun and exciting gift boxes.The supplies include a hot glue gun, Beacon 3-in-1 glue, Stamperia papers, chipboards, Venice lace, Rosette lace, Prima Marketing metal handles with the Prima Marketing waxes, Tim Holtz Ideo-ology metal labels and plain ole wooden 8 1/2" square cigar boxes made by Darice from some local craft stores or on-line. I added some additional lace and 6mm flat back pearl string from my stash collected over the years.
I love how I can personalize my projects with this gorgeous Stamperia Ceremony and Stamperia Alphabet papers in this pad that captures the beauty and tranquility of shabby chic or vintage handmade cards, mini albums, journals, and scrapbook pages along with unaltered projects like covering my wooden box that will be filled with chocolates, gifts, a card.


But if you aren't familiar with Mod Podge, it's a decoupage medium — an all-in-one glue, sealer and finish used to attach paper and fabric to various surfaces. To give these boxes a little sheen and finished appearance, I used a Mod Podge after gluing the Stamperia papers on the top, inside lid and bottom of the box before adhering the embellishments.


I hope I have inspired you try out these products available at The Rubber Buggy on-line store. My cards and projects are always posted on Saturday. Keep watching and thank you so much for those wonderful comments as well as suggestions.
Enjoy and Happy Crafting!
 |
Dress My Craft Cards
Hi everyone, Steph Ackerman here today with lots of fun products from the store. Please visit the store for all the fun products I've used today.

Dress My Craft is a new craft line from India. Their paper collections are beautiful and the papers are heavy weight. I'm using papers from the Whispering Love collection.


Stamp phrases from the Art Impressions stamp set using Memento Tuxedo Black Ink. Punch out one phrase and mat other phrases with black cardstock. Add each to the cards with Scrapbook Adhesives 3D Foam Squares.

Thank you for visiting

Dress My Craft is a new craft line from India. Their paper collections are beautiful and the papers are heavy weight. I'm using papers from the Whispering Love collection.

Create two 6" x 6" cards from Bazzill Licorice Twist cardstock, using Scor-Pal Scoring Board to create the top fold. Use the pink dotted paper for the base of each card. Wrap ribbon around one of the dotted panels before adhering it to the card.

Using a floral layer, cut the paper into four 6" panels, then select two panels and tear to fit the cards. Tear strips of black cardstock and adhere to the floral layers. Then adhere the layers to each card.


Thank you for visiting
Wednesday, March 4, 2020
Masculine Birthday Card
Hello friends! Today I'm sharing a card set featuring
Ciao Bella Start Your Engines
This paper collection is so perfect for the guy in your life and has so many beautiful embellishments to coordinate with it. I love the bright colors, it can be used for Father's Day or Birthday's or any masculine occasion! It's perfect for layouts and card making!
I recently watched a movie called Ford Vs. Ferrari and this paper reminds me of that. My husband is also a lover of fast cars and has owned a few fast cars in his lifetime. This birthday card however is for his uncle who actually races.
I kept this card clean and simple. The sentiments are from my stash.


Be sure to stop by the Rubber Buggy Store and pick up this awesome collection!
Ciao Bella Start Your Engines
I recently watched a movie called Ford Vs. Ferrari and this paper reminds me of that. My husband is also a lover of fast cars and has owned a few fast cars in his lifetime. This birthday card however is for his uncle who actually races.
I kept this card clean and simple. The sentiments are from my stash.


Thanks for stopping by the Rubber Buggy blog today.
Debbie
Debbie
Saturday, February 29, 2020
Lawn Fawn Pivot PopUp Birthday Card
Welcome back and Nancy, here, to share with you some exciting Lawn Fawn dies that I know you will want in your crafting supplies for your next cards. I will be showcasing in this site the Lawn Fawn Pivot Popup Die Set and Lawn Fawn Just Stitching Hearts besides other wonderful supplies that are available at The Rubber Buggy on-line and retail store. 

I cut out a the Lawn Fawn Outside Inside Stitched Scalloped Rectangle die for the frame and die cut the hearts using Lawn Fawn Just Stitching Hearts die set. These double stitched hearts are only stitched and does not cut out a heart die, making these stitching hearts great for adding a decorative touch to your background! I used my die cutting machine to add different size hearts to the background and sponged on pastel colored inks in the center of the hearts.
The Stamping Bella UpTown Girls- Bianca Loves Her Big Cake was stamped and colored with Copic Markers. I used the NUVO Simply White Gloss for the cake and polka dots on her dress. I let the drops dry for a few hours. I cut out the stamp and used Beacon 3-n-1 Advanced glue to adhere Bianca and the cake to the card. The gorgeous pink patterned paper is from the Lemon Craft Sweet Secret collection. The banner was made using the Lawn Fawn Wavy Banner Set with the Lawn Fawn Wavy Saying Stamp Set. You will want to cut out the banner first and then stamp the sentiment on the banner.
I added a handmade bow with a Wild Orchid Craft flower in the center.
 |
| Lawn Fawn Just Stitching Hearts |
 |
| Lawn Fawn Pivot Popup Die Set
I added the Lawn Fawn Pivot Popup Die Set for the inside of the card. This set includes everything you need to create a four-panel pop-up scene that twists open inside your card! Use the included hills, trees, and clouds to decorate your scene, or use the panels as a starting point to create your own pop-up masterpiece! This panel can be used on a portrait or landscape side of the card. You will need to watch the video on assembling the pivot before you begin. Lawn Fawn made a video that goes through the steps. Click on Here to take you to this video.
|


I had so much fun making this card and hope you will too. So have fun crafting this weekend with these products. My cards and projects are always posted on Saturday. Keep watching and thank you so much for those wonderful comments as well as suggestions.
Enjoy and Happy Crafting!
|
Thursday, February 27, 2020
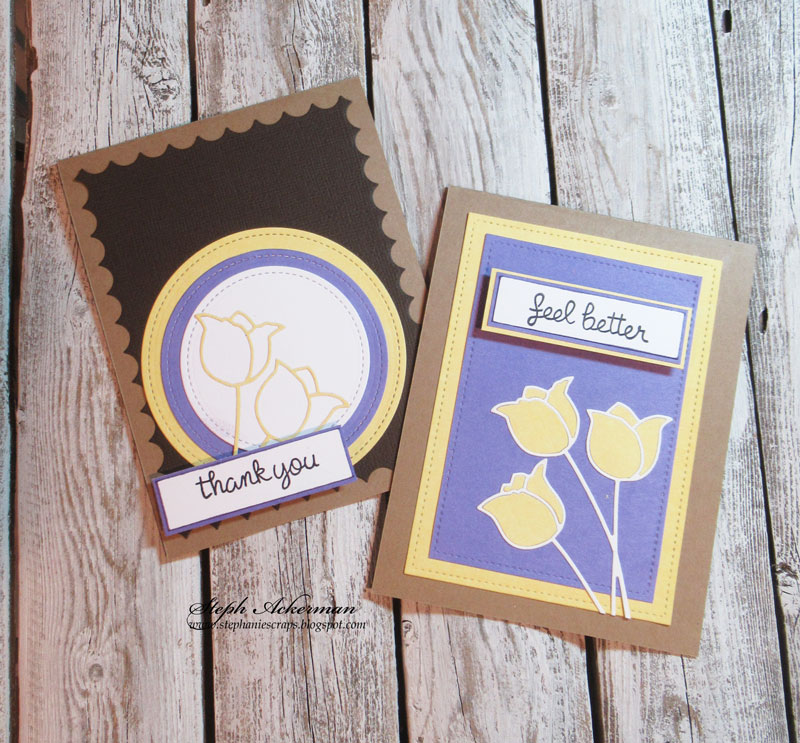
Beautiful Tulips
Hi everyone, Steph Ackerman here today with lots of fun products from the store. Please visit the store for all the fun products I've used today.

Using the Memory Box Tulip die, I die cut it with Bazzill Marshmallow and Sour Lemon Cardstocks. This is a great die to create cards with both the positive and negative pieces.

Die cut Bazzill Sour Lemon and Jelly Bean Cardstocks with Lawn Fawn Stitched Rectangle dies.


For my second card, I used the die cut sour lemon tulips, opting not to fill them in. I placed the tulips on 3 layers of cardstock die cut with Lawn Fawn Circle Stackable dies, creating a silhouette effect. Thank you was placed in the lower corner.

The card was created from brown cardstock and the Lawn Fawn Bayou Backdrop die

Thank you for visiting

Using the Memory Box Tulip die, I die cut it with Bazzill Marshmallow and Sour Lemon Cardstocks. This is a great die to create cards with both the positive and negative pieces.


Place the white tulip in the corner and add the lemon die cut pieces to complete the tulips. Use Lawn Fawn stamps to stamp a phrase using Memento Tuxedo Black Ink. Double mat and add to the card with Scrapbook Adhesives 3D Foam Squares.


Wednesday, February 26, 2020
Easel Hat Card
Hello friends! Today I'm sharing a easel hat card featuring
This paper collection is just so gorgeous and has so many beautiful embellishments to coordinate with it. I love the bright colors, it can be used for Birthday's, Mothers Day, Easter, Weddings or any occasion! It's perfect for layouts and card making!
I used


Be sure to stop by the Rubber Buggy Store and pick up this beautiful collection!
Stamperia House of Roses
I used
Velvet ribbon for the bow and beaded lace for the hatband and from my stash. The flowers are also from my stash.
The hat is created using Tutti Designs Nesting Stitched Circles and are available at the Rubber Buggy Store.
The hat is created using Tutti Designs Nesting Stitched Circles and are available at the Rubber Buggy Store.


The sentiment is also from my stash and is a Penny Black Stamp called Heartfelt Thanks.
Thanks for stopping by the Rubber Buggy blog today.
Debbie
Debbie
Saturday, February 22, 2020
Ciao Bella Easter and Spring Cards
Hello friends! Today I'm sharing a card set featuring
This paper collection is just so gorgeous and has so many beautiful embellishments to coordinate with it. I love the bright colors, it gives me Spring fever! It's Perfect for bright Spring/Easter layouts and card making!


The sentiment, flowers and ribbon are from my stash.
Be sure to stop by the Rubber Buggy Store and pick up this beautiful collection!
Ciao Bella - Sicilia- 12 x 12 Prints Paper Collection.


Be sure to stop by the Rubber Buggy Store and pick up this beautiful collection!
Thanks for stopping by the Rubber Buggy blog today.
Debbie
Debbie
Subscribe to:
Posts
(Atom)


