Thursday, April 7, 2016
On your Big Day
Hi everyone, Steph Ackerman here on this lovely Spring Thursday. And finally the sun is shining and there is a hint of the flowers that are yet to come.
It's time for a birthday card. We all need them, so why not create several to have on hand. I've used the Bella's Party stamp from Wild Rose Studio, coloring it with assorted Copic markers.

I placed the image on Blue Fern Studios. I lightly stamped the Vintage Fence clear stamp from Kaisercraft using Ranger Distress Ink in Fossilized Amber.

The image was fussy cut and placed upon a die cut. The sentiment is from Art Impressions and was inserted slightly under the Spellbinders die cut.
Thank you for visiting
It's time for a birthday card. We all need them, so why not create several to have on hand. I've used the Bella's Party stamp from Wild Rose Studio, coloring it with assorted Copic markers.

I placed the image on Blue Fern Studios. I lightly stamped the Vintage Fence clear stamp from Kaisercraft using Ranger Distress Ink in Fossilized Amber.

Thank you for visiting
Tuesday, April 5, 2016
New mini serie: Travel album process
Hi everyone!
Pi here.
I'm starting a new process serie where you can follow me making a travel album.
This will hold my vacation to Italy in 2010, so it's been on my to do list for a while - LOL!
I have shared a couple of 12x12 layouts earlier during my time on the design team. But I have lately discovered that I enjoy pocketed scrapbooking more as I get more memories documented faster. I would never have managed to get my baby's first album done by now if I were to document everything in 12x12 layouts. I'll be sharing some of my project life too soon.
Products from The Rubber Buggy:
Simple stories snap green 6x8 fuax leather album
Simple stories you are here snap pages
Simple stories you are here snap pack
Simple stories you are here bradz
Simple stories you are here enamel dots
Simple stories you are here expression cardstock stickers
Thank you for visiting!
Pi here.
I'm starting a new process serie where you can follow me making a travel album.
This will hold my vacation to Italy in 2010, so it's been on my to do list for a while - LOL!
I have shared a couple of 12x12 layouts earlier during my time on the design team. But I have lately discovered that I enjoy pocketed scrapbooking more as I get more memories documented faster. I would never have managed to get my baby's first album done by now if I were to document everything in 12x12 layouts. I'll be sharing some of my project life too soon.
Products from The Rubber Buggy:
Simple stories snap green 6x8 fuax leather album
Simple stories you are here snap pages
Simple stories you are here snap pack
Simple stories you are here bradz
Simple stories you are here enamel dots
Simple stories you are here expression cardstock stickers
Thank you for visiting!
Monday, April 4, 2016
Blue Fern Studio Paisley and Vine

Welcome today to The Rubber Buggy with me.. Bev ... I have this fun, fab page using a photo of my eldest Grand Daughter. OMG they grow up so fast.
Supply List:
The Rubber Buggy Products
Paper: Blue Fern Studio Paisley & Vine
Chipboard: Blue Fern Studio Postage Frame
Ink: Tim Holtz ranger
Other: stencil, paint, rubons, sew easy ink roller circle, washi tape, mesh, EK punch, cardstock, TS sketch
The Rubber Buggy Products
Paper: Blue Fern Studio Paisley & Vine
Chipboard: Blue Fern Studio Postage Frame
Ink: Tim Holtz ranger
Other: stencil, paint, rubons, sew easy ink roller circle, washi tape, mesh, EK punch, cardstock, TS sketch

When stenciling a background.. it's best to glue down your layers and stencil over them all before adding the photo.

In this central photo you can view the main section with photo, the great copic coloured chipboard frame,some fun accents, rubons, punched flowers and the title "Authentic".

A closer view and details. Notice the border run of washi tape... and small rubon flowers.

This shows the sew easy ink roller circle, some rubon and a piece of mesh.


Happy to see you. Come back again soon.
Saturday, April 2, 2016
Heartfelt Creations stamp and die cards

Welcome to my The Rubber Buggy blog post today. It is full of super amazing mix of cards using the Heartfelt Creations Daisy Patch Stamp and Die Collection.
Supply List:
The Rubber Buggy Products
Markers: Copics
Ink: Tim Holtz mini pads, Memento
Die Cuts: Spellbinders
Chipboard: Blue Fern Studio
Heartfelt Creations: Daisy Patch stamp and die set
Other: ribbon, cardstock, embossing. sentiments, brads

As you can see each card has it's very own unique design... each one different but using amazing pieces from this collection. Colours are your choice too.

Flowers can be in singles, groups and bunches.. they are fabulous.


thanks for visiting today... see you again soon.... Have a great day.
Friday, April 1, 2016
Rustic Card
Hi everyone!!
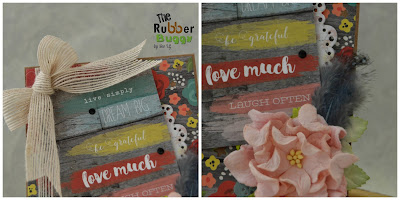
Noe here to show you a new card out of my confort zone! A Card with rustic touches!! Hope you like it!!
 Supply list:
Enjoy your weekend!! See you next Friday!!

Thank you for visiting
Noe here to show you a new card out of my confort zone! A Card with rustic touches!! Hope you like it!!

- Life in Color 6x6 Paper Pad
- Maple Leaves
- 3.5 cm Gardenia Pale Pink
- Starry Nigth Background Die
- Heartfelt Creations Paper Kraft

Enjoy your weekend!! See you next Friday!!

Thank you for visiting
Thursday, March 31, 2016
It's Coffee Time
Hi everyone, Steph Ackerman here on this lovely Spring Thursday. It's still cool; however the sun is shining.

Today I'm using the Heartfelt Creations Coffee Talk All Stacked Up Cling Stamp set. This fun stamp set contains two images and two phrases and I've used all of them on these cards.
The cards, created from Bazzill cardstock, are 3 1/2" square. The center panels were created by placing the Memory Box Drip Rings Stencil on white cardstock and inking with Ranger Distress Inks in Tea Dye and Walnut Stain using Ranger Ink Blending Tools.


Thank you for visiting.
Steph

Today I'm using the Heartfelt Creations Coffee Talk All Stacked Up Cling Stamp set. This fun stamp set contains two images and two phrases and I've used all of them on these cards.
The cards, created from Bazzill cardstock, are 3 1/2" square. The center panels were created by placing the Memory Box Drip Rings Stencil on white cardstock and inking with Ranger Distress Inks in Tea Dye and Walnut Stain using Ranger Ink Blending Tools.


I stamped the phrases directly on the stenciled backgrounds using Memeto Tuxedo Black Ink. The cups were colored with assorted Copic Markers, then fussy cut and added to the cards with Scrapbook Adhesives 3D foam squares for dimension.
Thank you for visiting.
Steph
Wednesday, March 30, 2016
A4 Layout with Netra
Hi everyone ! Today I am sharing an A4 layout !
Its a new size for me, so I kept it simple and easy for myself.
I used the
The Ephemera that matches
I hope you like the layout, although very simple, and it helps you
try a new size in scrapbooking.
Thank you for visiting


Subscribe to:
Posts
(Atom)


