Tuesday, November 8, 2016
Sprinkled with Joy

Hi Everyone it's Jennifer here and hope you had a lovely
Weekend. Did you all get some Crafty time in? Well I am here with
my weekly post and I have used the new
such a fun set to play with I have teamed it up with the
Which worked perfectly. I did need a bigger sentiment so I used
this gorgeous one from Joy to the Woods and I will definitly
be using that one a lot more as I love the script on it.
For the Frame I used Lawn Fawn Stitched Rectangles Small
largest inside of Lawn Fawn Scalloped Rectangles largest one I
also raised it with foam tape for extra dimension.

Now how cute is! This door is hinged so it opens and gotta
love the adorable tin of frosting. I tied the open me sign
with Lawn Fawn Sweetheart Twine. I have also coloured
everything in Copics
C01, C03, C05
BG11, BG13, BG23
R35, R37, R59

It is also a shaker card and you all know I love a shaker.
I popped some of the cute Gingerbread Men, trees and stars
with some Sequins to finish it off.
All these products and more are avaliable at the
down the side too, Instragram and the Rubber Buggy Design Team Blog
where there's a post nearly everyday from one of the team.
Enjoy your Crafting Week Everyone!
Jennifer
Monday, November 7, 2016
"Beautiful' using Blue Fern Studio Attic Charm

Hi Bev here today at The Rubber Buggy I am sharing a photo of my eldest Grand Daughter. With the colouring in the photo I went to Blue Fern Studios Attic Charm for the soft elegant colours to make the photo pop. So many other amazing accents and my page came together.
Supply List
The Rubber Buggy Products
Paper Blue Fern Studio Attic Charm
Accents: Art C Lace ephemera collage kit,
Flowers: Wild Orchid flowers open Roses mixed
Ink: Tim Holtz ink
Marker: copics
Other: Creative Embellishments Chipboard and Stamp paint splat trio, lace, beads, metal accent
The Rubber Buggy Products
Paper Blue Fern Studio Attic Charm
Accents: Art C Lace ephemera collage kit,
Flowers: Wild Orchid flowers open Roses mixed
Ink: Tim Holtz ink
Marker: copics
Other: Creative Embellishments Chipboard and Stamp paint splat trio, lace, beads, metal accent

For this page I started by ripping, inking and gluing back together the pieces to 12x12 size. I did some stamping and inking on the background for depth and texture.
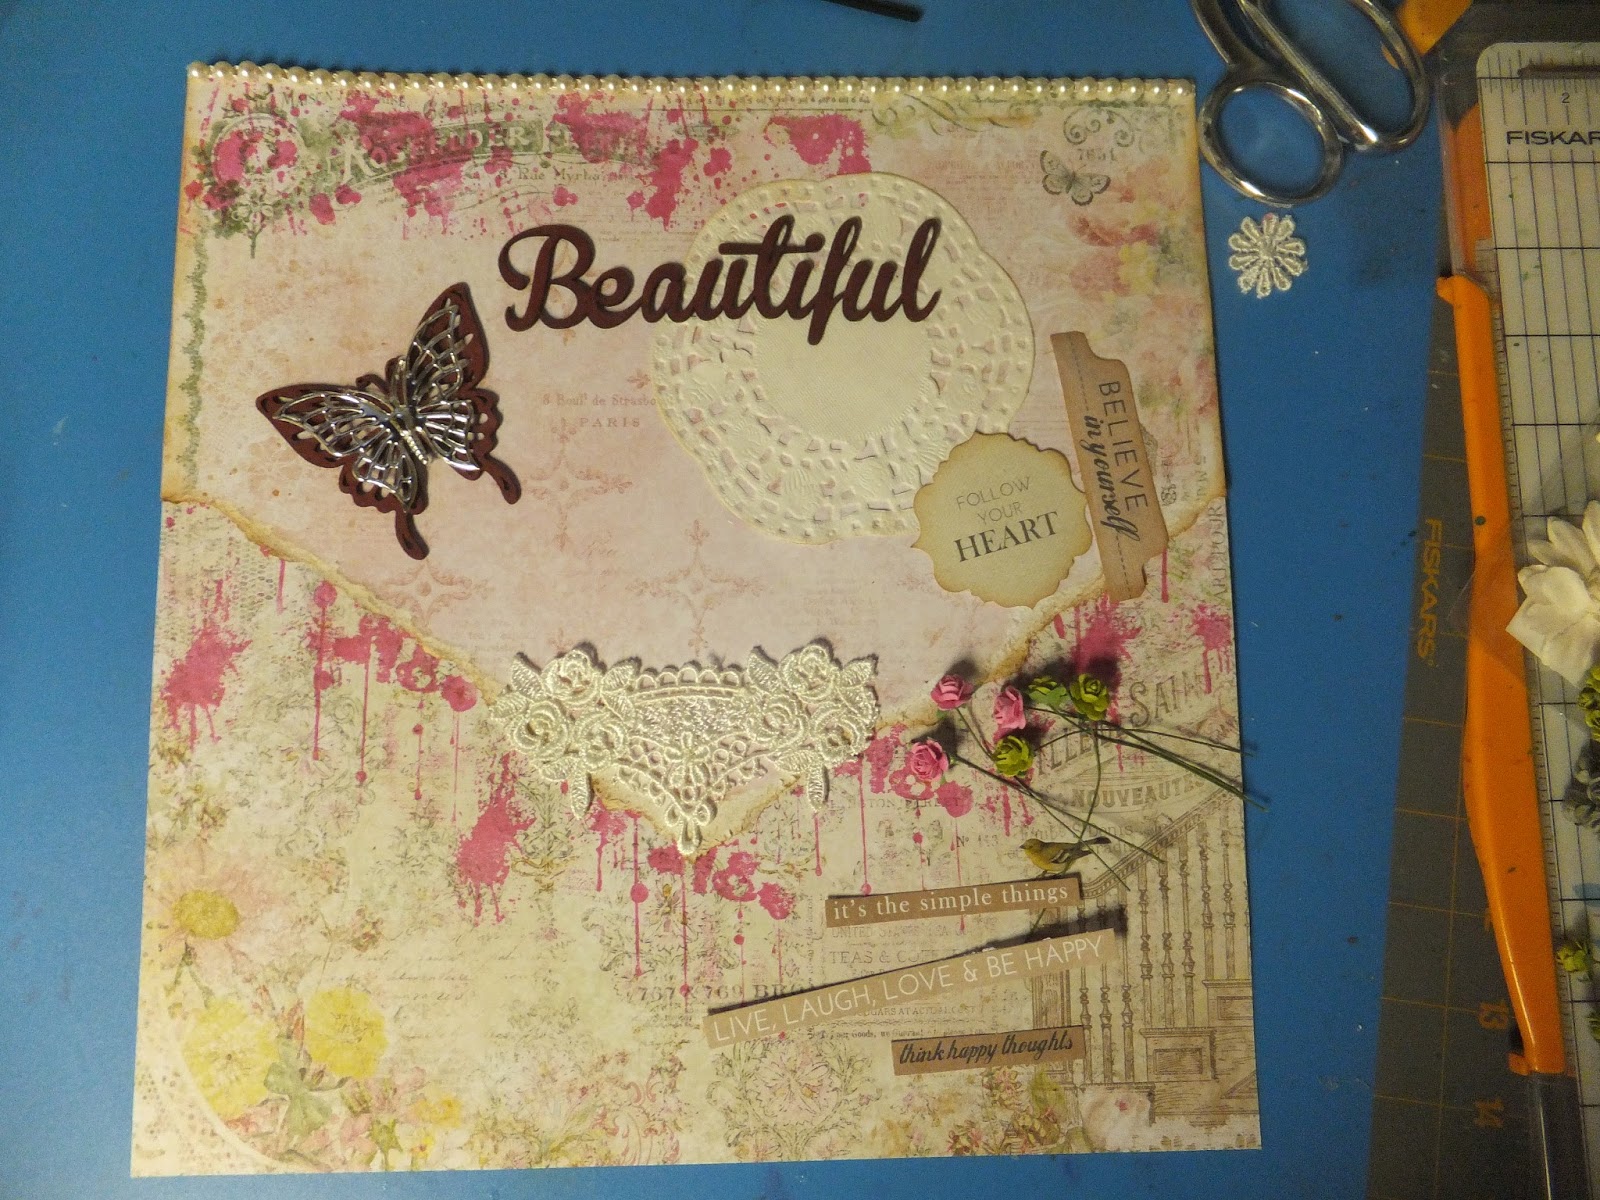
Estimating the placement of the photo... I worked around that area and pulled some accents .... chipboard and metal butterfly, chipboard title, some lace, cluster of flowers and some strips of paper and beads.

In these photos you will see up close the fabulous accents and their placement. The chipboards are copic coloured and the metal butterfly is placed over the chipboard one..

On this section we see some Art C empheria, the ribbon wrapped floral cluster, a tag and inked edges.

This section showcases some lace and ribbon accent along with a closer look at some of the stamping and inking.


Thanks for stopping by.. hope to see you again soon.

Saturday, November 5, 2016
Christmas Angels
Hi, I am back and excited to share with the next three Saturdays cards made by me, Nancy Hill, using the four basic supplies shown below from The Rubber Buggy on-line store.
 |
| Tutti Designs- Snowglobe Expressions - Tutti-143 NUVO Glitter Drops - White Blizzard Maja Vintage Autumn Basics Pion Designs - Silent Night I |


The Rubber Buggy on-line store is selling the NUVO brand. If you are new to with NUVO, I would suggest the very gorgeous NUVO Glitter Drops - White Blizzard. There are other beautiful colors to order and I plan to get most of them. Also, NUVO Glitter also comes in a paste for other ways of using it.

I uses this bottle for the perfect drop that looks like a clear glittery pearl on the snowflake or spread the glitter around like I did with the angle wings.
When I am done with the drops, I put a small 1/2" thin wire into the tip of the bottle with a part of the wire bend on the outside of the tip when I screw the lid back onto the bottle. When I am ready to use the NUVO bottle again, the glitter will easily flow out of the bottle. If the glitter glue begins to not flow as well, I use the same thin wire and poke it down the tip to get the glitter glue to come out better.
The angels came from the Pion Design - Silent Night I collection and the background was from the Maja Designs - Autumn Vintage collection. I added more snowflakes using an old stamp to the Maja Designs - Autumn Vintage paper and added NUVO Glitter Drops to each snowflake. The frame was cut using the quality cardstock from Bazzill. The Rubber Buggy sells many of the Bazzill colored card stock which I would highly recommend.


Additional supplies used were the 4mm flat back pearl string, May Arts ribbon with a ribbon buckle slider.
Now it is your turn to try these products out from The Rubber Buggy and see what you create!
Thank you again for visiting me today. I will be sharing with you next Saturday another exciting project or card made using the wonderful Rubber Buggy supplies.
Nancy Hill
Designer for The Rubber Buggy

Friday, November 4, 2016
Lawn Fawn Candy Bags
Hi!
It´s Noe here with a different project to show you... when I first saw this cute Lawn Fawn die I knew had to be mine... How much possibilities!! ... cookie boxes, boxes of sweets for children, box for small details, etc...
Look at these!


Products used from Store:

Thank you for visiting
It´s Noe here with a different project to show you... when I first saw this cute Lawn Fawn die I knew had to be mine... How much possibilities!! ... cookie boxes, boxes of sweets for children, box for small details, etc...
Look at these!

With this die there is no excuse for customization those little details !!


Products used from Store:
- Holiday Party Animal Stamp Set.
- Smart Cookie Stamp Set.
- Fall - Perfectly Plaid Lawn Fawn Papers
- Christmas Collection Pack Lawn Fawn Papers.
- Copics Markers

Thank you for visiting
Thursday, November 3, 2016
Winter Deer Card
Hi everyone, Steph Ackerman here today working with an assortment of products from the store. I hope you've had a chance to explore the store.


Using a premade card, cut Bazzill cardstock to fit. The gorgeous deer paper is from Riddersholm Design. This is a wonderful collection called Christmas Cosy and I've used both sides of the Deer paper for the card.

Side one with the Deer was used as the background. The deer were die cut with Spellbinders dies and added to the card on a cardstock base. I used a strip of the reverse "wordy" side to cross the center of the card. Atop that I added the Deer image that was die cut from the paper and matted with cardstock.
This is a beautiful paper collection.
Thank you for visiting
Wednesday, November 2, 2016
Sending Letters with Netra
Happy November everyone!
I am so happy for a new month, with wonderful memories.
I have been toying with ways to send letters.
I decided to use a new Prima Product.
These are the Planner Pockets.


I decided to cover up the holes along the side.
I decorated using the Prima Rossibelle collection and inside a letter can fit.
I just need to find a pen pal now LOL
Hope you like this idea. How are you sending Your Letters?
Thank you for visiting
Tuesday, November 1, 2016
Twisted Easle Card - Penguin With Present

Hi it's Jennifer here with my Tuesday Post and today I and doing
a tutorial on a Twisted Easle Card.

Ok so for the base you need Bazzill cut to 29cm x 14.5cm then scored
in half. On one half score corner to corner.

Then fold to look like this.

Cut 2 of the next layer 14cm x 14cm.

Then for the next layer I used Lemoncraft Christmas Greetings Paper
and cut 2 at 13.5cm x 13.5cm

I then cut one of each layer just cut corner to corner.

The base was then layered with the cut papers.

I then cut one of each 13.5 x 8cm White, Red 13cm x 7.5cm and
Green one 12.5cm x 7cm for the top part of the Easle Card.

For the bottom part of the Easle Card cut one of each 13.5 x 4cm, 13.3 x 3.5cm
13cm x 4.5cm.
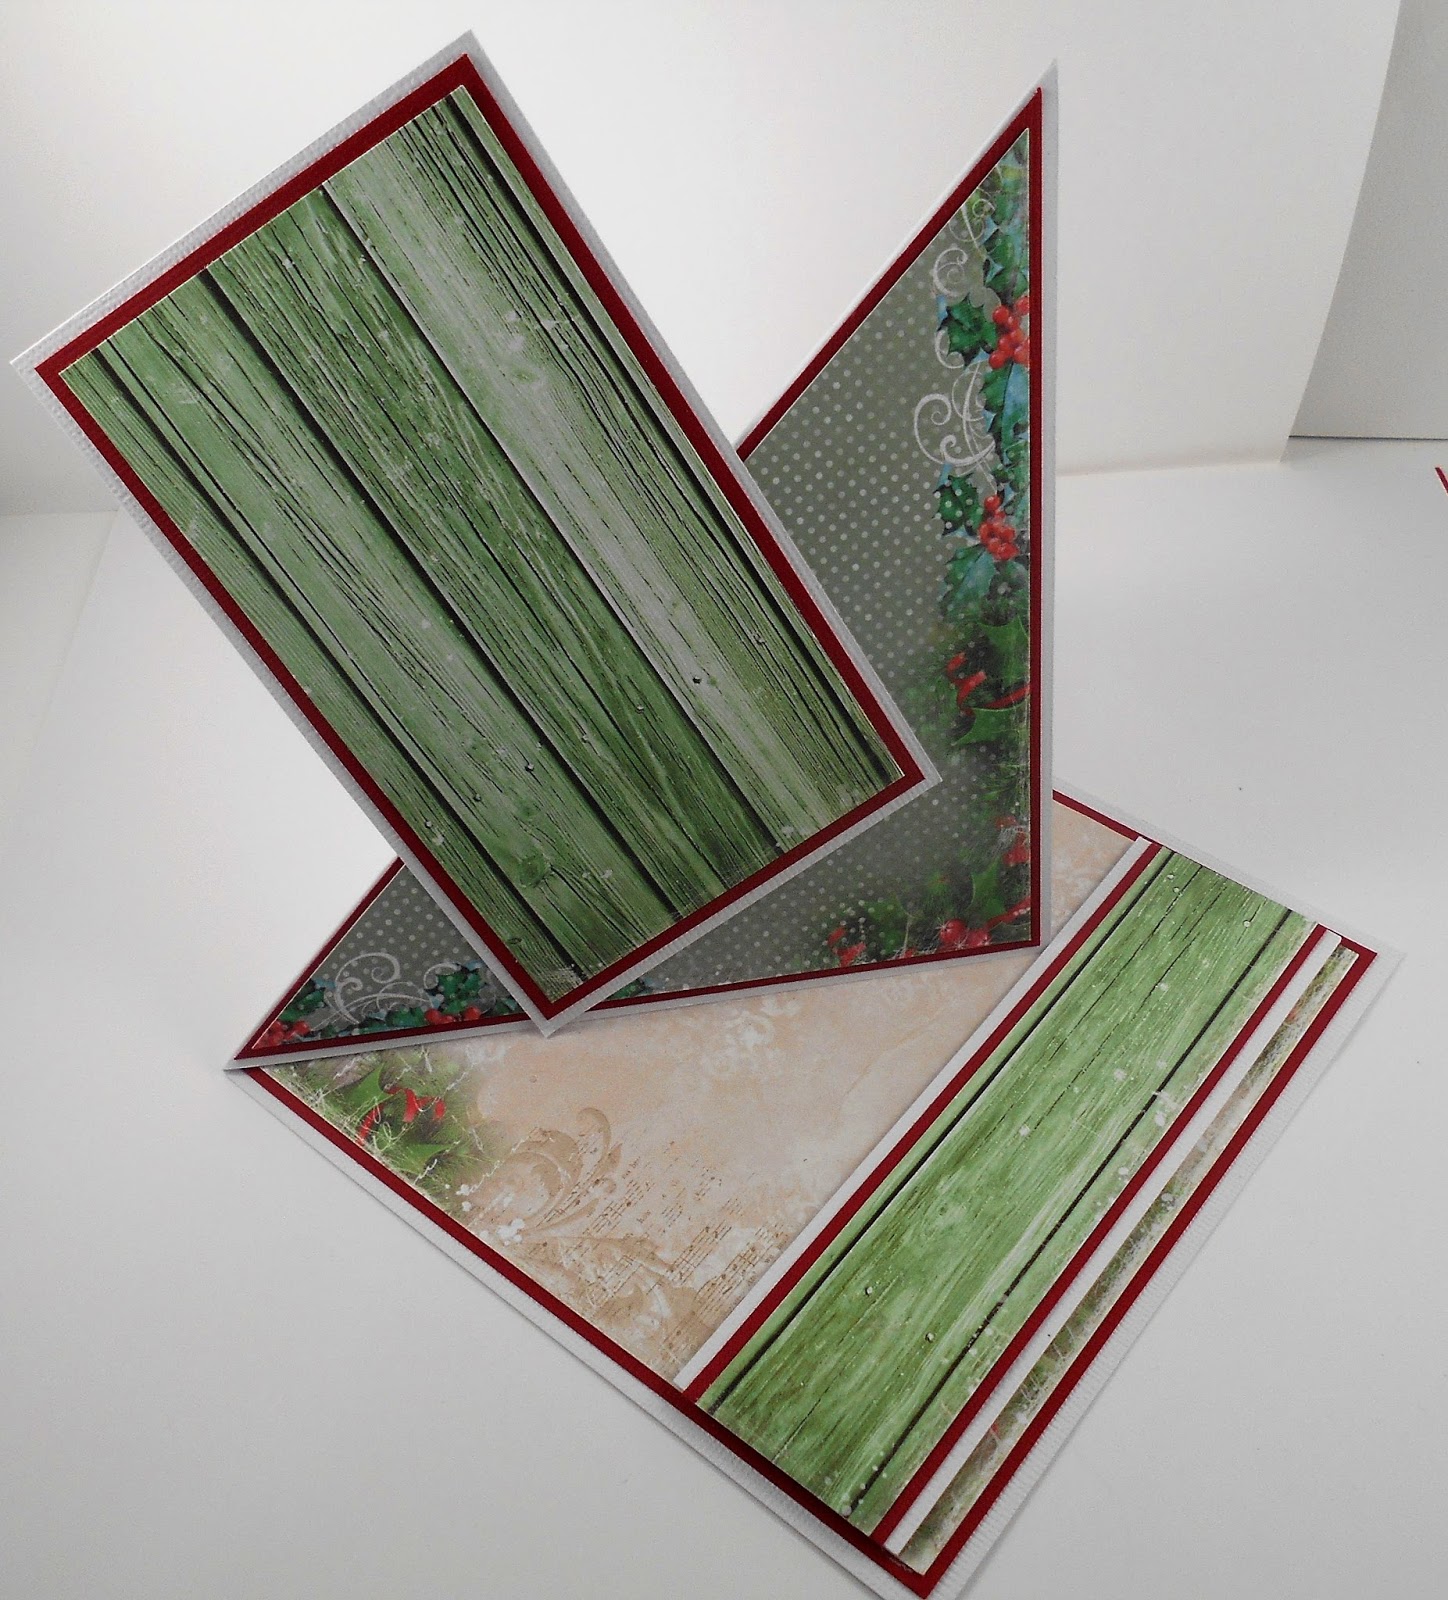
Layer them up and glue them as in the picture.

I have then coloured up Wild Rose Studio Stamps Penguin with Present
with Copics
Y15, Y18, 38
YR23
YG11, 63
G21
C0, C01, C03, C05, C07, C09
R35, R37, R59
and then decorated it

I have used the Wild Rose Studio's Snow Frame to frame up the
Penguin and I used the smaller one on the base and its all ready for
a sentiment. The Gorgeous lace is May Arts White Pearl Centre Lace and
All these products and more are avaliable at the
down the side too, Instragram and the Rubber Buggy Design Team Blog
where there's a post nearly everyday from one of the team.
Enjoy your Crafting Week Everyone!
Jennifer
Subscribe to:
Posts
(Atom)


