Thursday, November 29, 2018
Christmas Patchwork Cards
8:00 AM
Hi everyone, Steph Ackerman here today with lots of fun products from the store. Please visit the store for all the fun products I've used today.
Have you seen The Rubber Buggy Card Quilt Background Die yet? It is amazing. Start by creating a card from kraft cardstock. Place the quilt die on the card and run through a die cut machine. Retain all the die cut pieces.
Use both of the dies and die cut Prima Misty Rose pattern paper. Again, retain the die cut elements. Using the die cut card, align the Misty Rose die cut pieces with the grid to create the card.
Die cut Lawn Fawn's Merry Christmas Line Border die from the same paper pack and add across the bottom of the card.
What do you think? 2 very different cards created using the same Card Quilt Background Die
Merry Christmas.
Thank you for visiting
Have you seen The Rubber Buggy Card Quilt Background Die yet? It is amazing. Start by creating a card from kraft cardstock. Place the quilt die on the card and run through a die cut machine. Retain all the die cut pieces.
Use both of the dies and die cut Prima Misty Rose pattern paper. Again, retain the die cut elements. Using the die cut card, align the Misty Rose die cut pieces with the grid to create the card.
Create a second panel by adhering the outer Misty Rose die to cardstock. Then, use the kraft cardstock die cut pieces to fill in the pattern.
Finish this card by adding Nuvo Crystal Drops - Oyster Gray - around the card.
Creating a second kraft card, add a pattern paper panel from the Prima Misty Rose paper pad on the card, then adhere the smaller quilted panel to the top of the card. Stamp Lawn Fawn Simply Winter Sentiments and add to card with foam adhesives.
What do you think? 2 very different cards created using the same Card Quilt Background Die
from the Rubber Buggy.
Wednesday, November 28, 2018
LemonCraft Yuletide Christmas Folio
12:00 AM
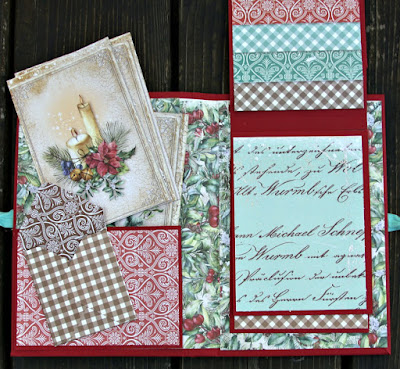
Hello Rubber Buggy Friends! Debbie with you today sharing a small Folio I made with the LemonCraft Yultide 12 x 12 Collection. This fun little Christmas Folio can be given as a gift or just to share with friends and guests. We usually have a quiet Christmas so I don't take a lot of photos but I thought this folio would be perfect for the ones I do take.
In this Collection there is a sheet with several cutouts, you could used them as card fronts or as journaling cards. I used them for both in this folio.
The folio itself is 8.5" x 5.5" and it has a 1" spine. Altogether it took me about an hour and a half to make it. If you'd like to see a video please leave a comment below and I'll put one together.
I added som glittery flowers to embellish it and the ribbon is just some I had in my stash.
When you open the cover it has a fun pocket for journaling cards and photos. I added a small envelope to the front of the cover using the WRMK envelope maker. I use this tool a lot, especially for these mini albums. You can stash small photos and personal notes in it and it has a place you can tuck a tag behind it too.
The back cover is a little waterfall album and it has places for 8 photos. I actually used a cut out to decorate my first page but you can certainly just add a photo there. It holds 8 - 4x6 photos
I hope you like this and like I said if you want to learn to make it,leave me a comment here and I will put a quick video together. These make great friend gifts and you can have it done fast.
Thank you for visiting,
Debbie
Tuesday, November 27, 2018
Christmas Gift Cards
3:00 PM
Hi it's Jennifer here with a couple of Gift Cards I have created
using the small Stamps and Dies from Lawn Fawn.


Monday, November 26, 2018
Sympathy Cards
12:00 AM
Hi.. it's Bev here today at The Rubber Buggy I am sharing some Sympathy cards. There are some fabulous dies out there that help make sympathy cards soft, elegant but send the reciever some heart felt wishes during this trying time.
Supply List:
Dies: tutti 267 Fluttering Butterflies, Tutti word set Sympathy, Memory Box 99735 Butterfly Spectacle (out of stock)
Glue: Beacon 3-in-1 Glue,
Ink: Tim Holtz Vintage PhotoStamping tool: Sweet Petunia mini Misti,
Machine/ tools: Vagabond
Other: Cardstock, papers from my stash
For stamping I use Mini Misti and Tim Holz Distress inks. My favourite glue is beacon 3-in-1 for small and large pieces. (there is a nack to drawing a fine line with this glue .. practice makes it easier so keep trying)
When doing these type of cards pick soft colours, use some layers, pick soft accents (flowers, butterflies, birds etc) and keep them simple and elegant.

Thanks for stopping by... hope to see you again soon.... but in the mean time be sure to stop by the STORE where these items and so many others are available. Also take note of all the products that aren't carried in our regular local stores. ... AND the service is A1.
Saturday, November 24, 2018
Delivering Christmas Presents
12:00 AM
Welcome back and Nancy is excited to share with you a Christmas card made with adorable Wild Rose Studio die, stamp and paper collection. Better order soon while these gorgeous Christmas supplies and products are available at The Rubber Buggy. I noticed some of the supplies that I wanted this year to make other Christmas cards are already sold out at The Rubby Buggy.
I stamped the Wild Rose Studio Christmas Labels stamp "Special Delivery" with a rose red ink and punched it out with an ole punch. I sponged on the same ink color around the sentiment and added 4mm pearls. The Rubber Buggy carries a variety of new snowflake dies which you will want to check out. The Rubber Buggy has Lawn Fawn Lacy Borders Lawn Cuts which is very similar to the scallop die for the outer edge of the card.
I added NUVO Ruby Slipper Glitter Drops to the center of some of the snowflakes on the card. The die behind the white snowflake die is the Wild Rose Studio Holly Vine die to the top corner of the card. The Rubber Buggy has the Zig Memory System Wink of Stella Brush Clear Glitter which is a must to have to brush this fine glitter around parts of the card as the final touch to accent the presents, bows and some of the snowflakes on the card.
 |
| Wild Rose Studio Girl With Christmas Presents and Wild Rose Studio Christmas Labels stamp |
 |
| Wild Rose Studio Frosted Lace Paper Pack and Wild Rose Studio Holly Vine Corner |
I hope I have inspired you try out these products available at The Rubber Buggy on-line store. My cards and projects are always posted on Saturday. Keep watching and thank you so much for those wonderful comments as well as suggestions.
Enjoy and Happy Crafting!
|
|
Wednesday, November 21, 2018
Christmas Card and Rubber Buggy
12:00 AM
Hello Rubber Buggy friends! Debbie with you today sharing a new Christmas card I made using Lemoncraft's Yuletide Collection I purchased from the Rubber Buggy Store. This collection is so pretty and has a gorgeous vintage feel to it. The collection comes with several beautiful panels like the one I used for this card. It's the kind of paper you hate to cut because it's so pretty!! You now the kind!
Anyway I added a little paper tearing on the corners and a little layering to give it some dimension. If you look close you can see the stickles on the berries. I used the sentiment from the stamps that came with the November card kit as well as the stickles.
This card is fast and simple and I hope you will give it a try!
Thank you for visiting,
Debbie
Tuesday, November 20, 2018
Twisted Card Tutorial - Oddball Snowman
1:00 PM
Hi Everyone it's Jennifer and I am here with another of the New Release
Stamps from Stamping Bella new in
I have created a Twisted Easel Card to pop my
Oddball Snowman on.
Oddball Snowman on.
Cut your base 5inches x 10inches
Cut 1inch in from the side and down 1 inch cut from 1 inch to 4 inches
Then do the same 4 1/8 inch. Repeat the same 5 inches in and 4 7/8
Cut in 1 inch in from the side and down 1 inch Cutting from
1 inch to 2 1/4inches then 2 3/4 to 4inches and
the same again just 4 1/8 inch in
Do exactly the same at 5 inches and 4 7/8
I then scored just on the frame at 1 7/8, 2 1/4, 2 3/4.
I then folded the valley in the scores.
I cut panels and layered them to fit.
For the Frame I cut 4 3/4 square then cut the centre out by having it
in 3/4 inch and cut 3/4 inch to 4 inches doing it 4 times turning the
square every time.
in 3/4 inch and cut 3/4 inch to 4 inches doing it 4 times turning the
square every time.
Decorate as desired . Finished


Bazzill
I hope you all have a Great Crafting Week
Jennifer
Subscribe to:
Comments
(Atom)
Total Pageviews

Powered by Blogger.


-
▼
2018
(240)
-
▼
November
(21)
- Christmas Patchwork Cards
- LemonCraft Yuletide Christmas Folio
- Christmas Gift Cards
- Sympathy Cards
- Delivering Christmas Presents
- Christmas Card and Rubber Buggy
- Twisted Card Tutorial - Oddball Snowman
- Simple Stories Simple Vintage Christmas 6x8" pad w...
- Stamperia Blue Land Collection product reveal
- Amazing Winter Scene using Dies
- Special Delivery
- No Dream is too BIG
- Forever Layout by Debbie Sherman
- Christmas is on it's Way - Oddball Elf
- Wedding Page using Graphic 45 Flutter Collection
- Magnolia Stamp Tilda With Holy Baby
- Wild Rose Little Robins
- All About Christmas
- "love" using Graphic 45 Flutter Collection
- Wild Rose Studio Teddy Christmas cards
- Love You A Bunch
-
▼
November
(21)


