Saturday, April 10, 2021
Country Livin Scrapbook page
Life is Better on the Farm as we say Livin The Good Life on our ranch/farm in Idaho! Nancy, here to share a fun made scrapbook page for my granddaughter. Coordinate the Graphic 45 Farmhouse with the Scrapaholic Rustic Layered chipboard to make a country lookin scrapbook page. These products are available at The Rubber Buggy.
The Graphic 45 Farmhouse collections of papers, chipboard and sticks have the gorgeous colors and images of barn red with golden wheat, golden yellow chicks, chalkboard black and buttery cream colors of the farm/ranch. The Scrapaholic chipboards also has other farm/ranch chipboard along with southwest chipboard.

The scrapbook page measures 12" x 12". I used two different Graphic 45 Farmhouse sheets with one behind the other. I used my finger to tear around the wheat sheet and distress sponging Ranger Distress Brown Espresso ink around the edges and used Beacon 3-n-1 Advanced glue to adhere to the other sheet of red and white flowers. I added some torn up ribbon behind the picture. I added some Prima Marketing Finnabair Metallique waxes on the Scrapaholic Rustic Layered chipboard and Scrapaholic Love Doodle Frame chipboard to bring out the rustic appearance. I added a small punched out circle and added a brad in the center of each wagon wheel.

I added a few Wild Orchid Craft Chrysanthemum flowers and handmade ribbon to the scrapbook page with a hot glue gun along with some jute.

Scrapaholic Love Doodle Frame chipboard
Thanks for your visit today! The Rubber Buggy has the crafting supplies for your next project. So have fun crafting this weekend with these products. My cards and projects are always posted on Saturday. Keep watching and thank you so much for those wonderful comments as well as suggestions.
Enjoy and Happy Crafting!
 |
Thursday, April 8, 2021
Stamping Bella Thanks Card
Hi everyone, Steph Ackerman here to share a sweet thank you card.
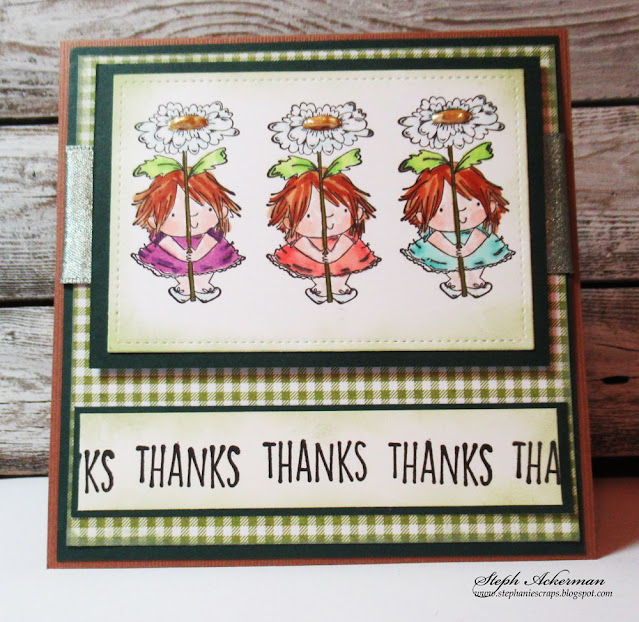


This Stamping Bella stamp set - Daisy Squidgy is so much fun to create with. The stamp set comes with 2 different sized images and a sentiment.

I stamped the smaller image three times on white cardstock, then die cut it with Lawn Fawn Small Stitched Rectangle Stackables. After coloring with Copic Markers, I added Liquid Pearls to the centers of the daisies. The panel was matted with Echo Park Dark Green Cardstock.

Creating a card from Echo Park Brown Cardstock, I wrapped a checked panel with ribbon and adhered the panel to the card.

Thanks was stamped repeatedly on a scrap of cardstock, then cut to fit the card.

Thank you for visiting
Saturday, April 3, 2021
Sew Happy Birthday
Welcome back and hope you are 'Sew' great this weekend. I wanted to make a friend a sewing theme card with a rather a shabby chic vintage feel. No sewing card would be complete without sewing items which came from from the gorgeous Scrapaholic Sewing Kit chipboard. I used a metallic silver spray to cover the scissors, sewing thread and needle and used pink baker twine in the center of the sewing thread.

I typed out and printed the sentiment used a scallop punched to cut it out and lightly sponged the Distress Ground Espresso ink on it before gluing the small buttons below it. I added EK Success 3D foam dots behind the sentiment
I embellished the card with a Wild Orchid Craft rose, doily, lace, needles in the center of the laced bow with beads to the needles, buttons, cut off measuring tape sponged with Ranger Distress Collage Medium Vintage which dries semi-translucent with a vintage tinted matte finish.
I used a hot glue gun adhering the chipboard and measuring tape to the card. The rest of the card was layered and adhered with Beacon 3-in-1 Advanced Glue.


Inside of the card, I added the same embellishments of a doily and cut out paper that resembles fabric from the Stamperia Provence paper. I was able to type and print the sentiment to add for the journal from the Stamperia Provence paper pad and adhered it with Beacon 3-in-1 Advanced Glue.


Thanks for your visit today! The Rubber Buggy has the crafting supplies for your next project. So have fun crafting this weekend with these products. My cards and projects are always posted on Saturday. Keep watching and thank you so much for those wonderful comments as well as suggestions.
Enjoy and Happy Crafting!
|
Thursday, April 1, 2021
Hello Cards with Dress My Crafts
Hi everyone, Steph Ackerman here today with a set of sweet cards.


It's been hard to get together with friends for such a long time, so occasionally I like to send a card letting them know I'm thinking about them.

These sweet cards were created with papers from Dress My Crafts Whispering Love collection. Since the papers are sturdy enough, I was able to create my 5 1/2" square card bases from the dotted paper.

Cutting the next layer to 6" x 6", I tore the papers then reassembled them with Bazzill Licorice Twist Cardstock between the layers. This really helps give the cards dimension without a lot of bulk. The torn panels were then cut to size, matted with black cardstock and added to the cards.

I've used the Memory Box Little Halo Hello die for the sentiment. The largest of the 2 dies measures approximately 2.7" x 1.4" and is the perfect size for cardmaking. One layer was cut from black cardstock and the other from Bazzill Marshmallow Cardstock. Once adhered together they were added to the cards and the cards were ready to send.

Thank you for visiting.
Saturday, March 27, 2021
Steampuck card with Craft O'Clock Age of Technology
Masculine-themed paper with grungy gears, light bulbs, top hats and classic cars are for the special male cards so start with the Craft O'Clock Age of Technology paper collection.

Age of Technology Extras to Cut II


 I cut out a few images from the Age of Technology Extras to Cut I
 I always love to add these gorgeous cardstock papers from each collection to the back of my cards and use a stamp to add my name to it.
Prima Marketing Waxes
Metal or paper die cut gears
Frame of card measures 6 1/2" square.

I used Prima Marketing Finnabair Mechanicals Set Hardware Accent hardware and Prima Marketing black gesso with the Prima Marketing Art Alchemy Metallique waxes or Prima Marketing acrylic paints to cover the gears. I used a paint brush for the gesso and paint and rubbered the wax on the gears with my fingers. I used a hot glue gun to adhere the metal embellishments on the card. Otherwise, I used the Beacon 3-n-1 Advanced glue to adhere the layers of paper. Some of the gears are Prima Marketing - Mechanical Gears. Also added were embellishments from the Tim Holtz Idea-ology Chipboard Alphabet dies and Graphic 45 Clock and Tag sets. In the card below, the beautiful amber stone is from the Prima Marketing Finnabair Art Ingredient Melange - Vintage Art Pebbles which I use often for my steampuck cards.

Age of Technology Extras to Cut II and added these to the front and inside of the card. On the left of the inside of my card, I adhered two cardstocks. I tore one of the edges and distress it as well as sponged on Ranger Distress Ground Espresso ink. I used the same ink to sponge around the sentiment on the right side and fussy cut some gears from the Extras To Cut - Age of Technology cardstock and added it to the sentiment. I always type a personal each sentiment and print it out for the inside of my cards.

Have a fabulous crafting day and thanks for visiting.
The Rubber Buggy has the crafting supplies for your next project. So have fun crafting this weekend with these products. My cards and projects are always posted on Saturday. Keep watching and thank you so much for those wonderful comments as well as suggestions.
Enjoy and Happy Crafting!
|
Thursday, March 25, 2021
Masculine Card with Tutti Designs Dies
Hi everyone, Steph Ackerman here today with a masculine card. Masculine cards are a bit more challenging to create as you don't want all the flowers and frills, but you still want a nice card.


Using Tutti Designs Dotted Rectangle slimline dies, I die cut one layer from Bazzill Jawbreaker Cardstock and the next size down from pattern paper.

I needed a masculine card and this older Prima Marketing stamp was perfect. I colored him with Copic Markers and then fussy cut him.

Before placing him atop the card with EK Success 3D Dots for dimension, I inked him with Distress Oxide Ink - Ground Espresso.

I used a stamp from Art Impressions Watercolor Cling stamp set using Lawn Fawn Licorice Ink. I wanted a smaller sized sentiment so I die cut black cardstock with the smaller Tutti die, then moved it 1/2" along the die and recut that end.

The sentiment was then placed along side of the image.

Thank you for visiting
Saturday, March 20, 2021
Gift Box with Craft O'Clock Vintage Treasure

Welcome back and Nancy, here. The new arrival of the Craft O' Clock Vintage Treasure papers are a gorgeous with the vintage colors and beautiful pink roses that made for my shabby chic Valentine's gift box. I have the 8" pads of this paper collection for this box but available in 6" and 12" as well.


I used the Sizzix - 3D Impresslits Embossing Folder By Tim Holtz - Trellis to frame the picture

I cut out four pieces of paper and sprayed each one with water before putting each one separately in the Trellis 3D Impresslits Embossing Folder. I had to change my Sizzix die cutting machine layers to fit the die/embossing folder in the machine. NOTE: Insert the folded part of this die through the die machine first. I have broken a few embossing folders in the past by not doing this. You may need to run this die through your machine 2 or 3 times but make sure your cardstock is slightly damp to get the embossing to
go through this thick die.
Let dry for about 10 minutes before coating the pieces.


I cut a rectangle size from the paper and sponged some Ranger Black Soot ink to the right size to blend more with the left side of the patterned paper.

Now, I will fill this box full of chocolate for a Valentine's gift.

I had so much fun making these gift boxes with these gorgeous paper collections available at
The Rubber Buggy. So have fun crafting this weekend with these products and keep watching and buy early when new arrivals are available since it won't be long before it is sold out. My cards and projects are always posted on Saturday. Keep watching and thank you so much for those wonderful comments as well as suggestions.
Enjoy and Happy Crafting!
|
Subscribe to:
Posts
(Atom)


