Thursday, April 9, 2020
Happy Easter Cards
Hi everyone, Steph Ackerman here today with lots of fun products from the store. Please visit the store for all the fun products I've used today.

Have you seen the new Lindy's Stamp Gang products available in the store? They are absolutely stunning and such a wide variety of products.
I've used Shimmer Magicals - Drop Dead Diva pigment powders. I began by spritzing a sheet of Strathmore Watercolor Paper with water then dropped the powders on the paper.

Once the powders were dropped on the paper, I used a paint brush to move them about the paper. Then I spritzed additional water and moved the paper so the colors would run.

Once I liked the effect, I heat set the paper.

I created 2 cards from Bazzill Licorice cardstock then cut the spritzed panel to fit each card. Each card was then wrapped with May Arts Sheer Ribbon.

Stamping Bella's Bunny and Her Daffodil was stamped with Memento Tuxedo Black Ink and then colored with Copic Markers. Each image was then die cut with Lawn Fawn's Stitched Rectangle dies. While the die remained in place, I colored around the first image with Weathered Wood Distress Ink using the Ranger Ink Blending Tool.

The second image was inked as the first image, but this time I used Milled Lavender Distress Ink. I love the white edge of the cardstock that shows.


The sentiment, Just for You, is from the Wild Rose Studio Antique Roses stamp set, was stamped with Memento Tuxedo Black Ink, matted with Licorice cardstock and added to the card.

Thank you for visiting.
Wednesday, April 8, 2020
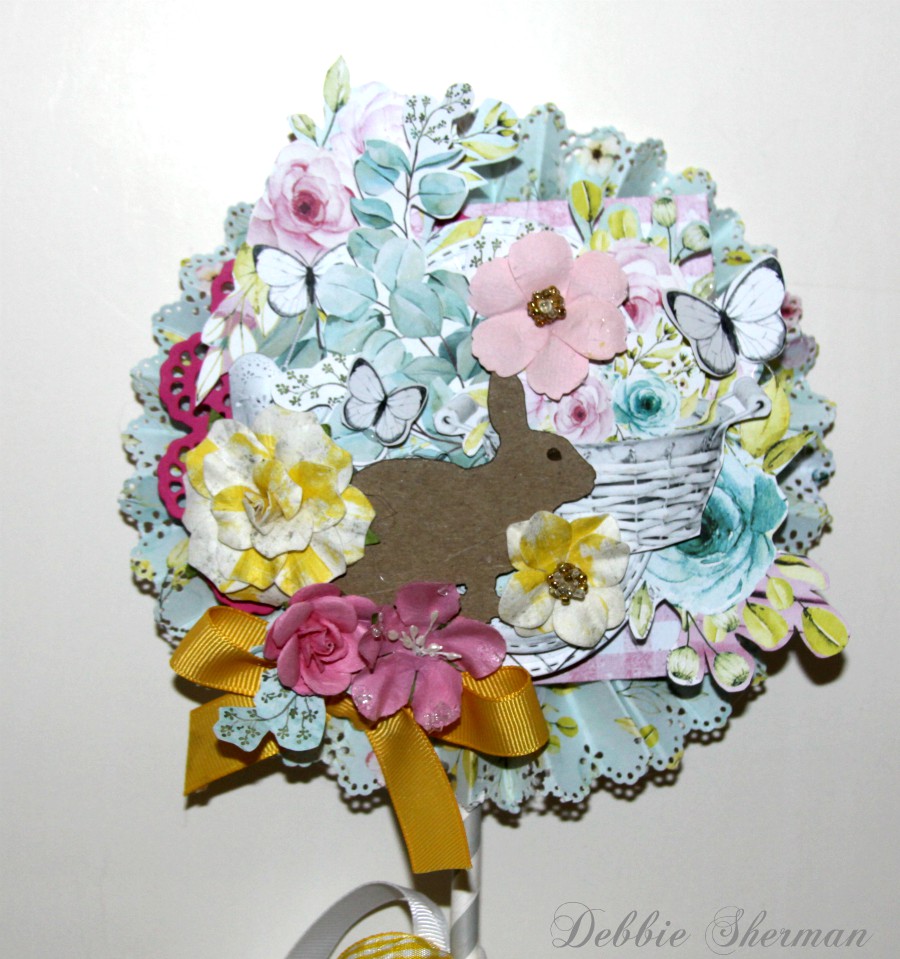
Easter/Spring Lollipop
Hello friends! Today I'm sharing a fun Easter/Spring Lollipop featuring
This paper collection is just so gorgeous and has so many beautiful embellishments to coordinate with it. This collection comes with cut outs and embellishments to help you create gorgeous layouts and cards too! If you love fussy cutting this paper collection is for you!
The Flowers are Prima Fruit Paradise and few from my stash.


The ribbon is also from my stash.
Be sure to stop by the Rubber Buggy Store and pick up this beautiful collection!
Mintay - Happy Place. I forgot how much fun these are to create!
This paper collection is just so gorgeous and has so many beautiful embellishments to coordinate with it. This collection comes with cut outs and embellishments to help you create gorgeous layouts and cards too! If you love fussy cutting this paper collection is for you!
The Flowers are Prima Fruit Paradise and few from my stash.



The ribbon is also from my stash.
Be sure to stop by the Rubber Buggy Store and pick up this beautiful collection!
Thanks for stopping by the Rubber Buggy blog today.
Debbie
Debbie
Saturday, April 4, 2020
Ciao Bella Sicilia Gift Box
Welcome back and Nancy, here. I am so excited to share my altered wooden box made with the beautiful Ciao Bella Sicilia paper collection.

So many birthdays this spring and I wanted to make this gift box filled with chocolate, adorable kitchen towels and also handmade items from Idaho to surprise my niece on her birthday. The
Ciao Bella Sicilia paper collection is available at The Rubber Buggy on-line store that carries all of the wonderful name-brand products and supplies for all of your crafting needs.


 |
| Inside with Gifts |
 |
| Inside |
 |
Back of Box With My Name on It
|

LeCrea Design Flower Foam. I used a hot glue gun to adhere the Prima Marketing Memory Hardware Petite Round Frame after adding some Prima Marketing waxes. Using an alphabet die, I cut out five sets of the word "Tammy" and glued each letter together to make five layers for height. I coated each letter with white gesso but any white paint will work. I applied the NUVO Aqua Shimmer pen to each letter. I added 1/75" wide Venice lace behind the resin frame. Also I used a hot glue gun to adhere the 5mm flat back pearls around the box.


The beautiful metal corners is from the Tim Holtz Ideo-Ology Metal Vignette Accents painted first with Prima Marketing Finnabair Art Basics - Heavy Gesso White and lightly dabbed the
Prima Marketing-Art Alchemy-Dragon Eye paint with the same brush in a few area. I really love the gold in this paint and recommend using wax paper inside the lid as extra to keep these jars from drying out. Some people also recommend putting the jars in a Zip Lock bag as well to prevent drying out quickly.

I had some resin fairies in my ole stash that I painted with Copic Markers and used a hot glue gun to adhere to the inside and on the front near the flowers.
I hope I have inspired you try out these products available at The Rubber Buggy on-line store. My cards and projects are always posted on Saturday. Keep watching and thank you so much for those wonderful comments as well as suggestions.
Enjoy and Happy Crafting!
I hope I have inspired you try out these products available at The Rubber Buggy on-line store. My cards and projects are always posted on Saturday. Keep watching and thank you so much for those wonderful comments as well as suggestions.
Enjoy and Happy Crafting!
 |
Thursday, April 2, 2020
Welcome Burlap Panel
Hi everyone, Steph Ackerman here today with lots of fun products from the store. Please visit the store for all the fun products I've used today.
What are you doing while you are waiting out the current pandemic? I've been going through my stash and organizing everything and pulling out products I want to use. This burlap panel is the result of just gathering supplies.

Using a burlap panel, I inked it with Ranger Distress Ink in Walnut Stain using a Ranger Ink Blending Tool. I cut Graphic 45 papers to fit, tearing the top layer and adding strips of Bazzill Licorice Twist Cardstock to help the panel pop. With so many different Graphic 45 papers available, any of them would be perfect for the center of this panel. I used US Art Quest Perfect Paper Adhesive to adhere the papers to the burlap panel.


Then I assembled the panel with burlap tags, paper tags (similar to the 7 Dots Studio tags), assorted flowers and clothes pins.


Thank you for visiting
What are you doing while you are waiting out the current pandemic? I've been going through my stash and organizing everything and pulling out products I want to use. This burlap panel is the result of just gathering supplies.

Using a burlap panel, I inked it with Ranger Distress Ink in Walnut Stain using a Ranger Ink Blending Tool. I cut Graphic 45 papers to fit, tearing the top layer and adding strips of Bazzill Licorice Twist Cardstock to help the panel pop. With so many different Graphic 45 papers available, any of them would be perfect for the center of this panel. I used US Art Quest Perfect Paper Adhesive to adhere the papers to the burlap panel.

I found some metal words at the Dollar Store, so I inked welcome with Ranger Embossing Ink and added color with Ranger Perfect Pearls in Forever Green and Perfect Copper. The embossing ink was a great foundation for adhering the perfect pearls. Allow to set for a few minutes, then brush away the excess.

Then I assembled the panel with burlap tags, paper tags (similar to the 7 Dots Studio tags), assorted flowers and clothes pins.
Welcome was added to the panel with US Art Quest Perfect Paper Adhesive as well as Scrapbook Adhesives 3D Foam Adhesives to pop it up in the center.

Think about using whatever you have handy and see what you can create.
Thank you for visiting
Wednesday, April 1, 2020
Spring Card Set
Hello friends! Today I'm sharing a card set featuring
This paper collection is just so gorgeous and has so many beautiful embellishments to coordinate with it. This collection comes with cut outs and embellishments to help you create gorgeous layouts and cards too! If you love fussy cutting this paper collection is for you!
The Flowers are Prima Fruit Paradise.


The sentiment and ribbon are from my stash.
Be sure to stop by the Rubber Buggy Store and pick up this beautiful collection!
Mintay - Happy Place
The Flowers are Prima Fruit Paradise.


Be sure to stop by the Rubber Buggy Store and pick up this beautiful collection!
Thanks for stopping by the Rubber Buggy blog today.
Debbie
Debbie
Saturday, March 28, 2020
Lawn Fawn Get Well Soon Picture Changer
Welcome back and hope you are having a wonderful weekend. I am excited to share two Lawn Fawn Before and After cards with you. Have a fast recovery with these cute critters! It’s perfect for wishing someone a speedy recovery from an injury or illness, or for simply offering some “feel better” support when times are tough using the Lawn Fawn Get Whale Stamp set.
Before you start on making your Lawn Fawn Before and After cards, you will need to watch the Lawn Fawn U-Tube tutorial, click HERE to understand the purpose of using a lot of baby powder or cornstarch on your picture changer to make the tab run smoothly up and down along with how to put the tabs together inside the picture changer. My grandson had wet hands and touched the picture changer. I thought the picture changer wouldn't work again so I waited until the card dried and applied the baby powder on the picture changer and now the tab goes up and down smoothly.


Supplies:
Lawn Fawn Get Well Before & After Stamp Set
Lawn Fawn Fall Fling collection 6" x 6" or 12" x 12"
Blue and sage green cardstock
Lawn Fawn Dad and Me stamp set (Fishes on bottom of whale)
Tim Holtz Distress Ink: Tumbled Glass (Ocean and around scalloped frame)
 |
| Lawn Fawn Get Well Before & After |

I was challenged with my first card and threw it away when I realized that I can't add any embellishment to the stamp on the picture changer when the tab wouldn't go up and down. Therefore, I reviewed the Lawn Fawn tutorial, click HERE, again and as well highly recommended on the tutorial was to add the baby powder or cornstarch to the stamped and colored image on the picture changer after being colored. The baby powder or cornstarch will make the tab work smoothly when pulling the tab. I fussy cut the stamped images and then adhered the extras on the the outside frame of the picture changer.
I sponged on Ranger Tumbled Glass ink to the ocean on the whale picture as well as the scalloped frame. I dabbed some NUVO Morning Dew gloss as well as the Prima Marketing Art Pebbles around the frame of the whale card for bubbles of the water.
I hope I have inspired you try out these products available at The Rubber Buggy on-line store. My cards and projects are always posted on Saturday. Keep watching and thank you so much for those wonderful comments as well as suggestions.
Enjoy and Happy Crafting!
|
Thursday, March 26, 2020
Beautiful Dress cards with Stamperia stamps
Hi everyone, Steph Ackerman here today with lots of fun products from the store. Please visit the store for all the fun products I've used today.


Once fussy cut, each piece was inked with Tea Dye Distress Ink using a Ranger Ink Blending Tool, then reassembled on the base image.


The pattern paper layer was added atop a Bazzill Butter Mint cardstock layer then added to the card base. The next layers were die cut using Lawn Fawn Stitched Rectangle Dies. The dress was added to the card with Scrapbook Adhesives 3D Foam Adhesives and the phrase slipped behind it.

My next card was created from Bazzill Candy Bar cardstock. The pattern paper layer was die cut with Lawn Fawn Stitched Circle Dies, added to a floral pattern paper, then added to the card. The dress was then added with Scrapbook Adhesives 3D Foam Adhesives and the phrase slipped behind it. Around the circle I added drops of Ranger Liquid Pearls.

Thank you for visiting.
Subscribe to:
Posts
(Atom)


