Thursday, September 8, 2016
Hello, Hello
Hi everyone, Steph Ackerman here today working with an assortment of products from the store.
I just want to say hello with these cards.

The Prima Marketing Dress Me Up Paper Pad is amazing with it's vast array of colors and patterns. This paper pad has been used on both cards. Bazzill Gumdrop cardstock was used to tie the papers together.

May Arts ribbon was tied to the band before adhering it to the card with foam adhesives from Scrapbook Adhesives. Several Petaloo hat pins were stuck into the tied ribbon.

The papers were torn for my second card giving it a different look. The die cuts are from Memory Box.
Thank you for visiting.
Steph
I just want to say hello with these cards.

The Prima Marketing Dress Me Up Paper Pad is amazing with it's vast array of colors and patterns. This paper pad has been used on both cards. Bazzill Gumdrop cardstock was used to tie the papers together.
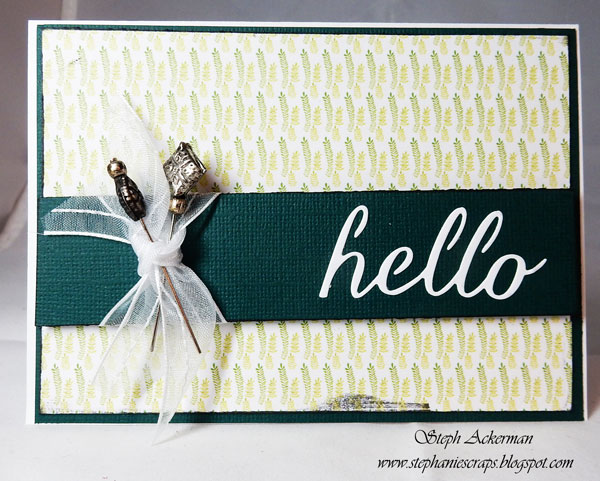
May Arts ribbon was tied to the band before adhering it to the card with foam adhesives from Scrapbook Adhesives. Several Petaloo hat pins were stuck into the tied ribbon.

Thank you for visiting.
Steph
Wednesday, September 7, 2016
Vintage Cards with Netra
So happy its Wednesday !
I hope this week has been wonderful for you all.
My love for vintage things is a growing obsession.
Even though I may venture out and do a fun and bright project....
I always return to vintage at some point.
So with the help of the
I was able to make some quick cards.
These packs are a fun no fuss way to create a
projects.
I used the "Victoria" Kit. But there are other beauties to choose from.
They are sooo jammed packed !

Here are my cards
I hope you like them.


Also Used:
Creating in Faith Stamp "Phrases"
Prima Resin Trinkets
Thank you for visiting
Tuesday, September 6, 2016
Magnolia Christmas Card

Hi it's Jennifer here with my Tuesday Post.
This week I have used this Gorgeous Magnolia Stamp - Hood Tilda
and coloured her up using Copics
The Colours are
E0000, E000, E00, E01, E11, E13, E50, E51, E53, E55
C0, C01, C03
R32, R35, R37, R59
I have used May Arts White Pearl Centre Lace and
Venise White Ruffle Lace to embellish the card and
also these stunning dies Memory Box Snowflake Die,
I have then finished it with these sweet Flowers in red and white

It's a little had to see but I have raised the
Memory Box Snowflake Die over Tilda and popped
a few pearls on the centre of the snowflakes.
All these products and more are avaliable at the
down the side too, Instragram and the Rubber Buggy Design Team Blog
where there's a post nearly everyday from one of the team.
Enjoy your Crafting Week Everyone!
Monday, September 5, 2016
Selfie by Bev using Blue Fern Studio Attic Charm Collection

Supply List:
The Rubber Buggy Products:
Paper: Blue Fern Studio Attic Charm Collection
Chipboard: Blue Fern Studio Selfies
Ink: Tim Holtz ranger, mini pad
Markers: copics
Stencil: The Crafters Workshop TCW554s mini butterfly collage
Die: Memory Box Lenora Bloom
Other:
Punch: We R Memory Keeper vine mini 8
Sketch: Creative Inspiration by Bev Code
Accents: Shabby is Chic Boutique flatback pearl flowers, lg silver metal filigree butterfly, heart charms, white rose trim, dangle trim, 50mm white lace butterflies




Instructions:
1: start by using the sketch below from Creative Inspiration (by me). Pick some mix and match papers to create your page.


2. cut some shapes using papers chosen. Die cut a fence accent (but didn't end up using it... it was too overpowering for photo.) Pulled the floral accents and the chipboard title.

3. With the background papers somewhat organize for positioning... I added the stenciling to the page. I copic marked the Title and also note the strip of lace trim on side of paper strip.

4. this is my proposed layout. .. not totally glued down so I can still make some changes.
5. Inked the paper edges. Added more lace instead of fence and found a metal charm and journal tag that would work with the rest of page.

6. Die cut the green follage to compliment the floral cluster section.

7. Punched and inked the doily, added a lace and metal butterfly together as 1 accent. Also added some pearl bling to the corners of the doily.

8. The upper right corner has a cute cluster of paper and piece of lace.

9. The central section in photo above shows more close up details of the page. Notice the pearl floral accents added to the lace border.

10. This close up gives you the perfect view of the layers and accents that make the photo pop and still remain the feature of the page.


Thanks for visiting ........see you again soon.

Saturday, September 3, 2016
Country Christmas Wreath

I love making Christmas cards and this time I am trying something new by adding some Ranger distress inks and the gorgeous Art Alchemy acrylic paints to my dies and card stock from The Rubber Buggy store.
I made this country wreath with this shining candle using the Tutti Designs Shining Candle die with gold and white shimmer card stock papers. I added some Wild Orchid Craft poinsettias and glued gold berries in the middle. I added gold glitter holly leaves with some pine spray to this candle.
I cut out the oval frame using the Spellbinder Oval Nestabilities and covered it with aluminum foil. I painted the aluminum foil frame with the gorgeous Art Alchemy Metallique Steampunk Copper and Ranger Ripe Persimmons Distress ink.
I had a snowflake chip board and painted it with Art Alchemy Metallique Steampunk Copper with Art Alchemy Opal Magic Rose-Gold.
The gorgeous printed paper is from the Lemon Craft House of Roses. I just love this stunning vintage 6" x 6" paper pad that come with 12 designs. Also, The Rubber Buggy carries a variety of Bazzill solid color card stock that I used behind the front of the card.
The Merry Christmas is from the beautiful new released stamp set from the Heartfelt Creation Celebrate The Season. You can also purchase the die set for these stamps.

Remember to visit The Rubber Buggy store to shop for those gorgeous dies, stamp supplies and other supplies for all of your projects, scrap booking and card making. You will be excited to hop on over to The Rubber Buggy Blog and The Rubber Buggy Facebook each day to see what the talented and creative designers have made with products from The Rubber Buggy store.
Thank you again for visiting me today. I will be sharing with you next Saturday another exciting project or card made using the wonderful Rubber Buggy supplies.
Nancy Hill
Designer for The Rubber Buggy


Friday, September 2, 2016
Friendly Filpbook
Hi everyone!!
Here Noe with another inspiration project to show you... And, at this time, out os my confort zone, that is... My first Flipbook!!
Yes, I've recently started in the Snail Mail World, is so funny to meet people from other places !! And to introduce myself to one of my new friends I´ve decided to do this project ... a flipbook with lots of tabs and pockets to hide some small gifts and of course, my letter !!
First I show the cover:

And now, inside:


Thank you for visiting
Here Noe with another inspiration project to show you... And, at this time, out os my confort zone, that is... My first Flipbook!!
Yes, I've recently started in the Snail Mail World, is so funny to meet people from other places !! And to introduce myself to one of my new friends I´ve decided to do this project ... a flipbook with lots of tabs and pockets to hide some small gifts and of course, my letter !!
First I show the cover:

And now, inside:


Funny, isn´t it? I really enjoyed doing it!!
Products used:
- Fun with Friends PhotoPlay Collection Pack.
- Stitched Party Banner Die.
- Large Stitched Rectangle Stackables.
- Bow and String Poppy Craft Die.
- Craft Medley Cup Sequins - Baby.
- Paper doilies.
- Washi Tapes.
Thank you for visiting
Thursday, September 1, 2016
Season's Greetings with Lawn Fawn
Hi everyone, Steph Ackerman here today.
Lawn Fawn has some amazing stamps and coordinating dies. Have you seen them yet? The store has an amazing assortment and with the holidays approaching, I decided to create a pair of Season's Greetings cards.


Lawn Fawn has some amazing stamps and coordinating dies. Have you seen them yet? The store has an amazing assortment and with the holidays approaching, I decided to create a pair of Season's Greetings cards.

I've used the Lawn Fawn Winter in the Park stamp set. I love that it has matching die cuts too - Winter in the Park Cuts. I created the first card out of Bazzill Licorice Twist cardstock and stamped the snowflakes randomly on the card. All other elements were stamped in Memento Tuxedo Black ink, then die cut and assembled on the card. A Spellbinders oval die was used to die cut the sentiment and the larger mat.

Next, I created a white card from Bazzill Marshmallow cardstock and stamped the snowflakes with Memento Summer Sky ink. A large Spellbinders circle was added to the card and the die cut elements were added on top. For dimension, the sentiment was matted and added to the card with Scrapbook Adhesives 3D Foam Squares.

This was such a fun stamp set to create with.
Thank you for visiting.
Steph
Subscribe to:
Posts
(Atom)


